Arduino: Your first project (as usual ...LED blinking)
Arduino: Your first project (as usual ...LED blinking
Let's move on to our first arduino project. "LED blinking"
Hardware required
* For this particular project you just require an arduino and a usb cable for programming. No other hardware required.Since Arduino board contains one LED connected to pin 13, we can use that.
Software required is Arduino.ide which can be downloaded from arduino website
https://www.arduino.cc/en/Main/Software
Am not going through the installation process (software)
As I said before, Arduino board has got one LED on pin 13 and we will be using that for our
"LED BLINKING PROJECT"
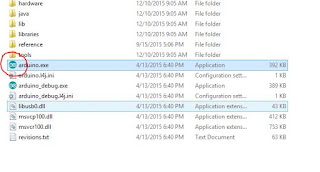
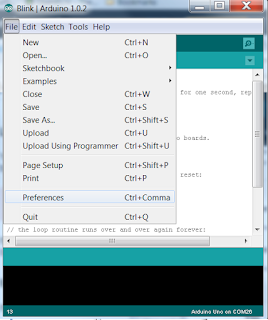
open Arduino.exe by double clicking on the icon

and you will get a window for typing your code.
There are two main parts for a program... The "setup" part and the "loop" part..
Setup - codes under this , only runs a single time ..
Loop - codes under this runs continuously ..infinite times ..
So all initializing and declaring parts of the code come under the "setup" part and which needs to be running continuously comes under the "loop" part ..
So here in our "LED BLINKING PROJECT " what we are going to do is to blink LED on pin 13 ,
ie: turn ON and OFF the led with a time delay in between..
Steps in programming
* we are using pin 13 . So need to specify that pin.. Since LED is an output device and we are outputting through pin 13 , we must specify pin 13 as OUTPUT .. this is how ..
pinMode(13, OUTPUT); // don't forget to add semicolon
*now we have specified our pin as output , now need to turn that ON ..turning On means making the pin HIGH ,ie: giving a HIGH value to pin 13..
digitalWrite(13, HIGH);
*Now to turn the led OFF or to make the pin LOW
digitalWrite(13, HIGH);
* Arduino contains a Delay function and it is in milliseconds, so if we need one second delay we should write it as "1000" not "1" as 1000 milliseconds is one second.. simple math :D
delay(1000);
the full code follows ...
void setup()
{
pinMode(13, OUTPUT);
}
void loop()
{
digitalWrite(13, HIGH);
delay(1000);
digitalWrite(13, LOW);
delay(1000);
}
I Guess you figure out how it works.. save the code and upload it in to your arduino .. after uploading you will see uour LED on board blinks with 1 second delay in between..
Change the delay and run the code and see how it works .. Enjoy :)
And now, its time make our "LED BLINKING" code a bit different .. I am going to add a few lines of code..
We are using pin 13 as led pin so I am going to specify ledpin as pin 13.. lik this ..
int led = 13; to the starting of the program .. So your program changes like this ..
///////////////////////////////////
int led = 13;
void setup()
{
pinMode(led, OUTPUT);
}
void loop()
{
digitalWrite(led, HIGH);
delay(1000);
digitalWrite(led , LOW);
delay(1000);
}
//////////////////////////////
Where ever I use led, it is 13.. Why i did is that , If I need to change my led from pin 13 to some other pin ..say PIN 10.. I only need one change in my code.. just change
int led = 10; // simple.. :)
Now change the Led from 13 to some other pin, say 10.. For that you need
*one 220 ohm resistor
* one breadboard
* one LED
This is because there is no on board LED for pin 10.. Connection is simple..
* If you are using pin 10.. connect resistor to pin 10 ..other end of resistor to breadboard.. connect the positive of led to same rail where resistor connected.. and negative of led to the ground of the arduino .. here is how it looks like ..

Let's move on to our first arduino project. "LED blinking"
Hardware required
* For this particular project you just require an arduino and a usb cable for programming. No other hardware required.Since Arduino board contains one LED connected to pin 13, we can use that.
Software required is Arduino.ide which can be downloaded from arduino website
https://www.arduino.cc/en/Main/Software
Am not going through the installation process (software)
As I said before, Arduino board has got one LED on pin 13 and we will be using that for our
"LED BLINKING PROJECT"

open Arduino.exe by double clicking on the icon

and you will get a window for typing your code.
There are two main parts for a program... The "setup" part and the "loop" part..
Setup - codes under this , only runs a single time ..
Loop - codes under this runs continuously ..infinite times ..
So all initializing and declaring parts of the code come under the "setup" part and which needs to be running continuously comes under the "loop" part ..
So here in our "LED BLINKING PROJECT " what we are going to do is to blink LED on pin 13 ,
ie: turn ON and OFF the led with a time delay in between..
Steps in programming
* we are using pin 13 . So need to specify that pin.. Since LED is an output device and we are outputting through pin 13 , we must specify pin 13 as OUTPUT .. this is how ..
pinMode(13, OUTPUT); // don't forget to add semicolon
*now we have specified our pin as output , now need to turn that ON ..turning On means making the pin HIGH ,ie: giving a HIGH value to pin 13..
digitalWrite(13, HIGH);
*Now to turn the led OFF or to make the pin LOW
digitalWrite(13, HIGH);
* Arduino contains a Delay function and it is in milliseconds, so if we need one second delay we should write it as "1000" not "1" as 1000 milliseconds is one second.. simple math :D
delay(1000);
the full code follows ...
void setup()
{
pinMode(13, OUTPUT);
}
void loop()
{
digitalWrite(13, HIGH);
delay(1000);
digitalWrite(13, LOW);
delay(1000);
}
I Guess you figure out how it works.. save the code and upload it in to your arduino .. after uploading you will see uour LED on board blinks with 1 second delay in between..
Change the delay and run the code and see how it works .. Enjoy :)
And now, its time make our "LED BLINKING" code a bit different .. I am going to add a few lines of code..
We are using pin 13 as led pin so I am going to specify ledpin as pin 13.. lik this ..
int led = 13; to the starting of the program .. So your program changes like this ..
///////////////////////////////////
int led = 13;
void setup()
{
pinMode(led, OUTPUT);
}
void loop()
{
digitalWrite(led, HIGH);
delay(1000);
digitalWrite(led , LOW);
delay(1000);
}
//////////////////////////////
Where ever I use led, it is 13.. Why i did is that , If I need to change my led from pin 13 to some other pin ..say PIN 10.. I only need one change in my code.. just change
int led = 10; // simple.. :)
Now change the Led from 13 to some other pin, say 10.. For that you need
*one 220 ohm resistor
* one breadboard
* one LED
This is because there is no on board LED for pin 10.. Connection is simple..
* If you are using pin 10.. connect resistor to pin 10 ..other end of resistor to breadboard.. connect the positive of led to same rail where resistor connected.. and negative of led to the ground of the arduino .. here is how it looks like ..

Hope you got everything right.. :) All the best with your projects..
If you got any queries, post it below, if its inside my range of knowledge I will definitely help you..
You can send me a mail nikhiljoji@gmail.com if you don't find response here.. :)
Comments
Post a Comment